Products Overview

DOLPHIN SERIES
ULTRASONIC TESTING

  • Trackside Wheel Crack Detection
  • Under Floor Wheel Set Inspection
  • Dismounted Wheelset Inspection
  • Hollow Axle / Solid Axle Testing

EGLE SERIES
MACHINE VISION

  • Trackside Full Vehicle View
  • Bogie Fault Check
  • Key-parts Monitoring

OWL-SERIES
MEASUREMENT AND DETECTION

  • Wheel Profile / Surface
  • Wheel Tread Wear
  • Quality Checks with the Train in Motionn

CUSTOMIZED
COMPONENTS & SOLUTIONS

  • Tailor-made UT Solutions
  • Probe Holders & Probe System Carriers
  • Ultrasonic Scanners

DOLPHIN SERIES – ULTRASONIC TESTING

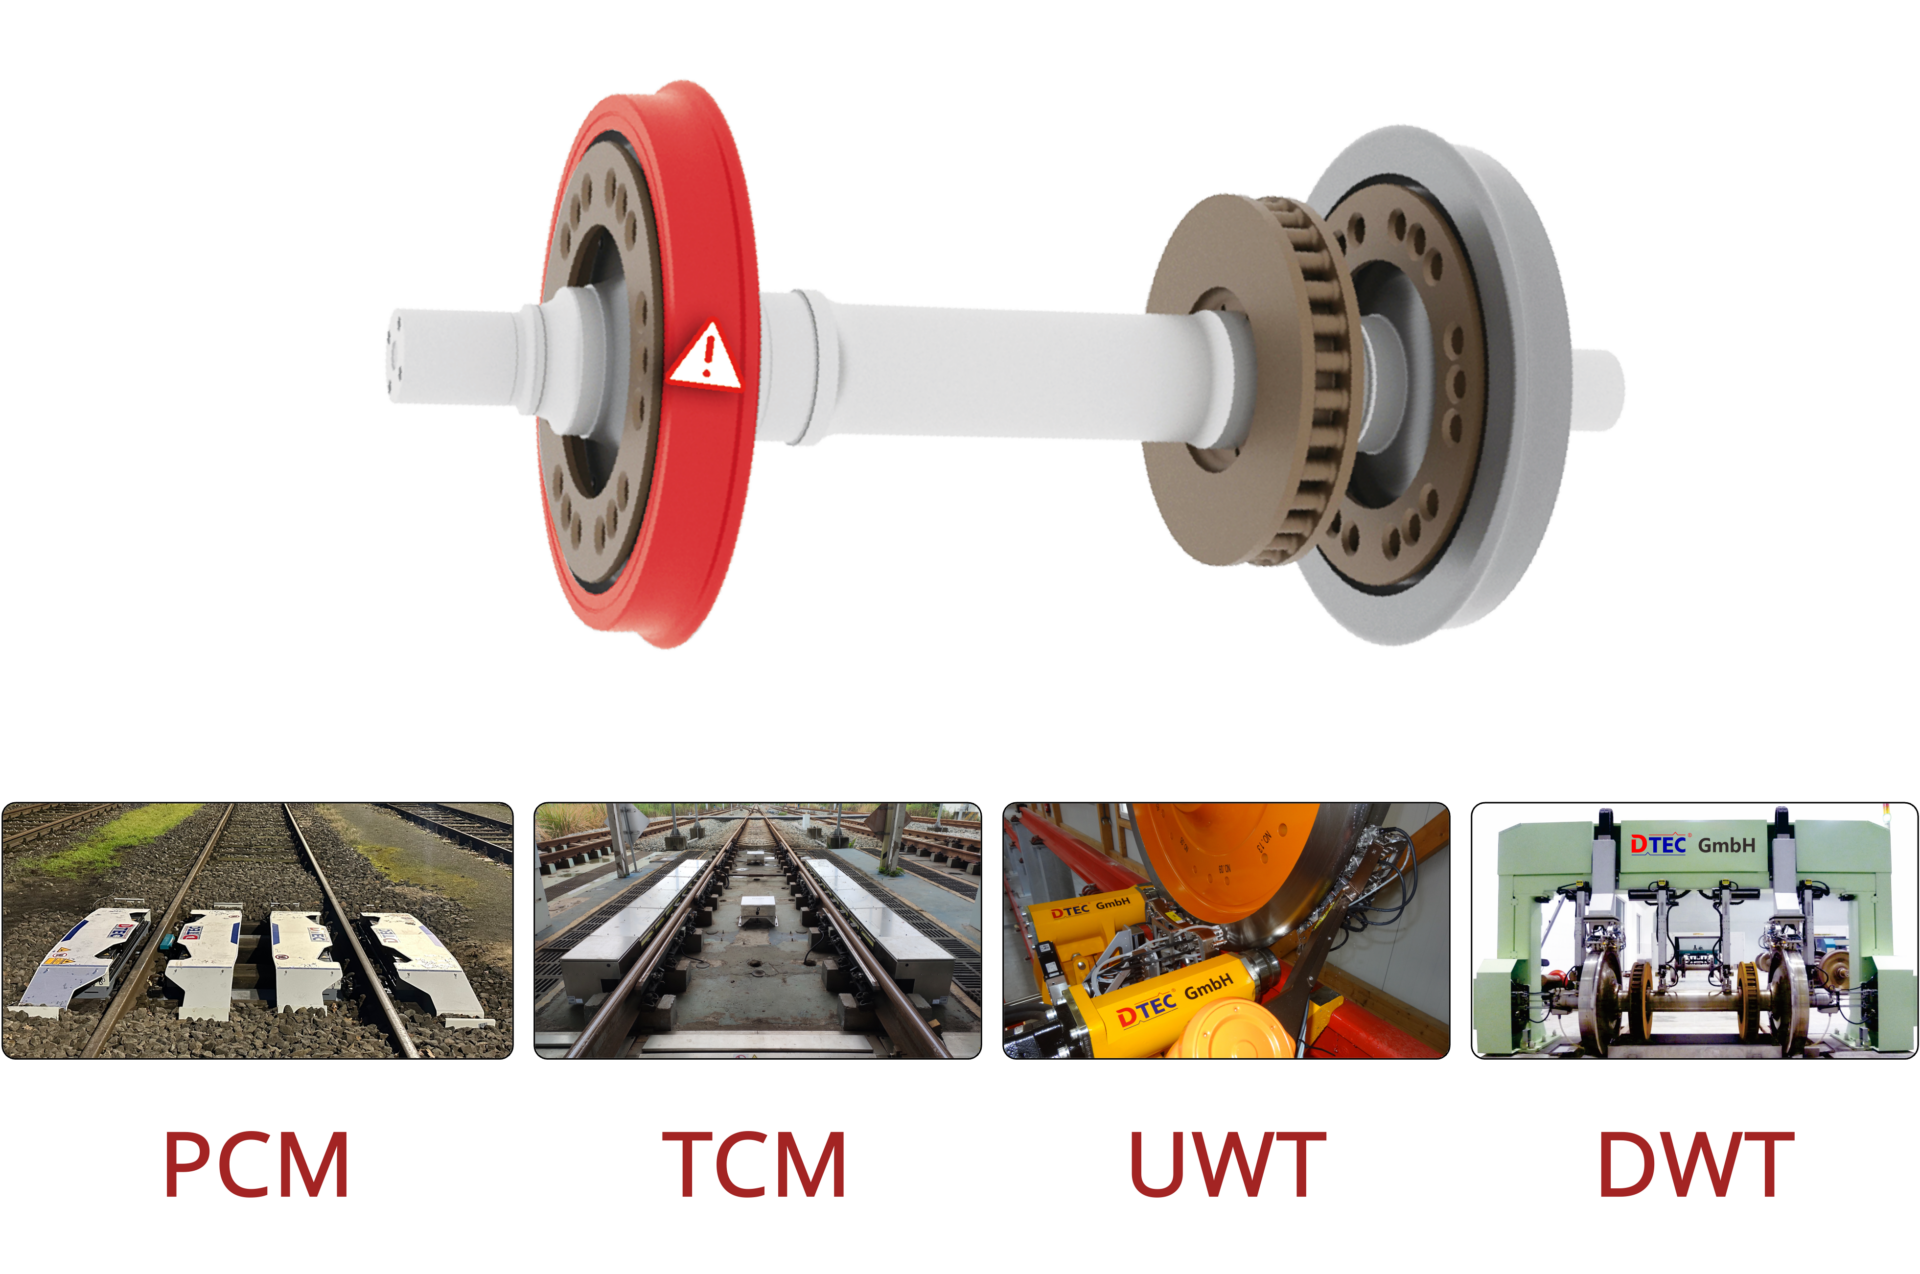
Ultrasonic testing (UT) is widely used in railway industry to find manufacturing flaws and fatigue cracks. To check wheelsets in different maintenance levels, including daily trackside testing, and periodic light and heavy maintenance, we developed a series of UT systems. At the depot entrance, the trackside check point, our Trackside Wheel Crack Ultrasonic Testing System (TWC-UT) is installed to find wheel fatigue cracks while the train is passing the inspection track at low speed. In light maintenance depots, the Underfloor Wheelset Ultrasonic Testing System (UW-UT) is designed to perform highly efficient, accurate, and highly reliable wheelset testing on the train. Finally, for the maintenance workshop application, a gantry system, the Dismounted Wheelset Ultrasonic Testing System (DW-UT) was developed to inspect dismounted wheelsets. DTEC also provides mobile UT systems for hollow axle and solid axle testing. Please check below our DOLPHIN SERIES – ULTRASONIC TESTING for details.

Trackside Wheel Crack 
Underfloor Wheelset 
Dismounted Wheelset 

| Wheel Fatigue Crack | Trackside Detection | Ultrasonic Testing

Dolphin UT

Trackside Wheel Crack Ultrasonic Testing System (TWC-UT)

INSPECTIONS AND MEASUREMENTS

  • Wheel rim fatigue cracks

FEATURES

  • Trackside wheel fatigue crack detection
  • Arrayed ultrasonic testing probes and modules
  • Dynamic ultrasonic testing coupling technique
  • AI-based automatic defect detection and reporting

SPECIFICATION

  • Inspection speed: 5-20 km/h
  • Ultrasonic configuration according to China Railway Regulations
  • Ultrasonic examination area: wheel rim
  • Wheel tread surface cracks: 20 mm (length) × 3 mm (depth)
  • Volume defects in wheel rim: Ø3 mm × 100 mm Side Drill Hole
Dolphin UT

Underfloor Wheelset Ultrasonic Testing System (UW-UT)

INSPECTIONS AND MEASUREMENTS

  • Fatigue cracks and full coverage of wheel flange, rim, and plate

FEATURES

  • Underfloor wheel fatigue cracks ultrasonic testing
  • Combination of conventional and phased array ultrasonic technology
  • Automatic operating, lifting, rotation, and inspection of the assembled wheelset
  • A/B scan, bar-chart, and wheel side-view data display and analysis
  • AI-based automatic defect detection and reporting

SPECIFICATION

  • Wheel diameter: 750 mm – 1250 mm
  • Inspection time: 8 min / wheelset (including preparation)
  • Ultrasonic configuration according to DIN 27201-7 and China Railway Regulations
  • Ultrasonic Examination Area: Wheel flange, wheel rim, plate
  • Volume defects in wheel rim: Ø3 mm × 100 mm Side Drill Hole
  • Wheel rim and plate surface cracks: 20 mm (length) × 3 mm (depth )

| Wheel Flange, Rim and Plate | Fatigue Crack | Phased Array UT| Undercarriage Operation

| Wheel & Axle | Fatigue Crack | Phased Array UT| Gantry system

Dolphin UT

Dismounted Wheelset Ultrasonic Testing System (DW-UT)

INSPECTIONS AND MEASUREMENTS

  • Fatigue cracks in wheel flange, rim, and plate area
  • Fatigue cracks in solid axle including press-fit area

FEATURES

  • Dismounted wheel and axle fatigue cracks UT
  • Combination of conventional and phased array ultrasonic
  • Automatic operating, lifting, rotation, and inspection of the disassembled wheelset
  • A/B scan, bar-chart, and wheel side-view data display and analysis
  • AI-based automatic defect detection and reporting

SPECIFICATION

  • Inspection time: ≤ 5 min / wheelset
  • Ultrasonic configuration according to DIN 27201-7 and China Railway Regulations
  • Ultrasonic Examination Area: Wheel flange, wheel rim, plate, and solid axle
  • Volume defects in wheel rim: Ø3 mm × 100 mm Side Drill Hole
  • Wheel rim and plate surface cracks: 20 mm (length) × 3 mm (depth)
  • Axle transverse cracks: ≥ tangential saw cut 1 mm depth
  • Full axle penetrating for sound attenuation check

EAGLE SERIES – MACHINE VISION

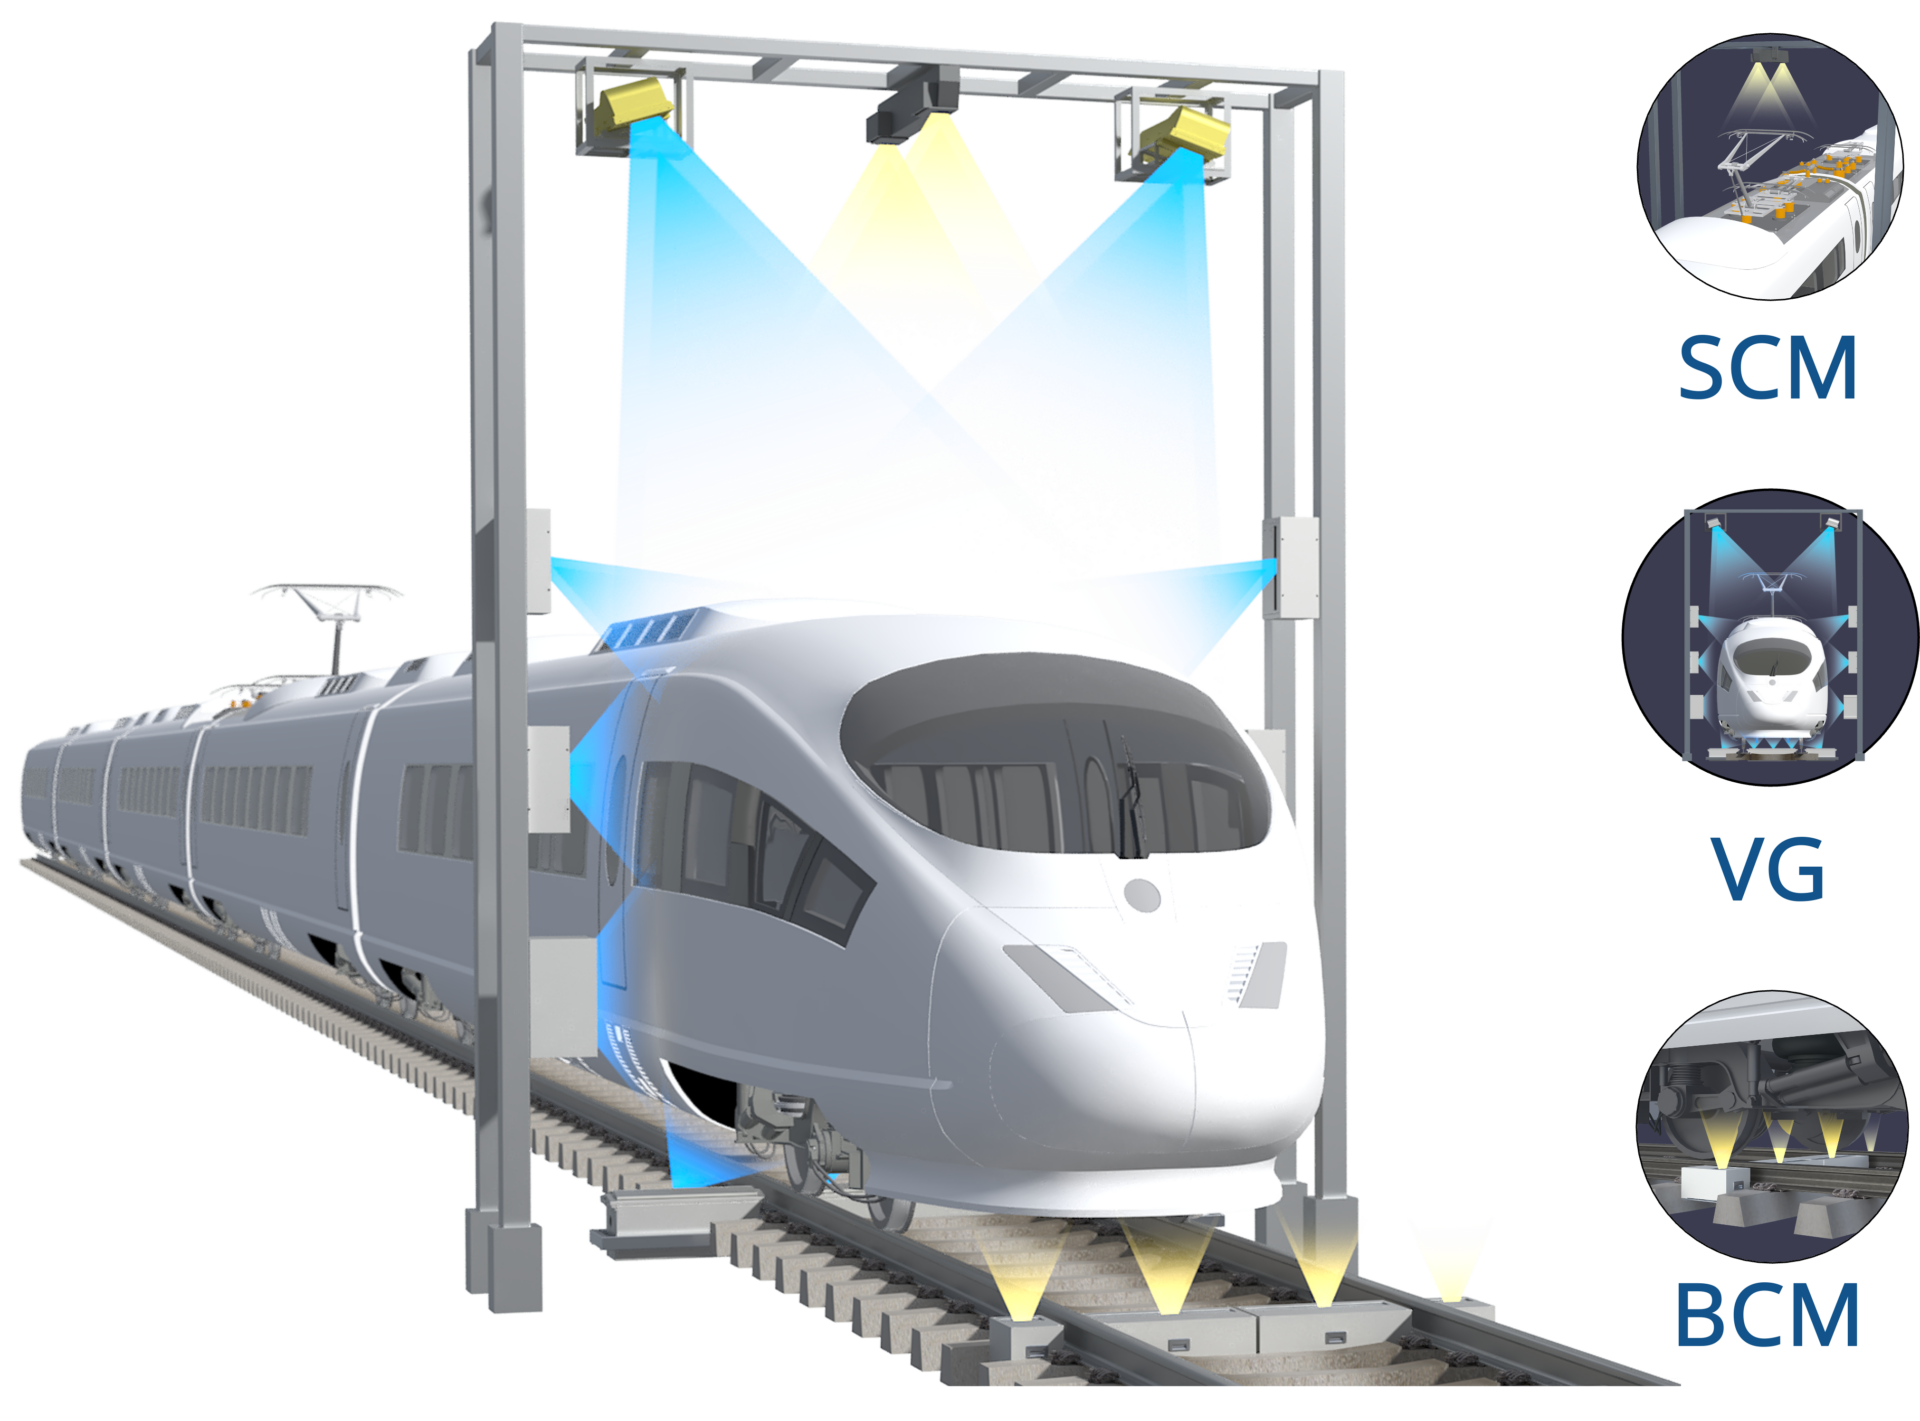
Thanks to our expertise in camera system design, machine vision methodology development, and 2D/3D image analysis, our EAGLE SERIES – MACHINE VISION solutions give you the capability of monitoring and measuring of wheel profile, wheel tread failure, wear out of brake pad and pantograph carbon contact strip, lost bolts, and other visible failures. Our Trackside Full Vehicle Machine Vision System (TFV-MV) can check your vehicle all around 360 degrees with a running speed of 15km/h at the depot entrance check point. When the train stops on the depot maintenance track, our Underfloor Vehicle Bogie Machine Vision System (UVB-MV) will check the train running gear parts from the pit. Driven by machine vision and AI technologies, our Eagle SERIES solutions directly offer you the vehicle key components monitoring and checking results, which used to be done by human eyes earlier. Please check below our EAGLE SERIES – MACHINE VISION for details.

Trackside Full Vehicle 
Underfloor Vehicle Bogie 

| Full Vehicle View| Components Monitoring| Failure Recognition| Predictive Maintenance| AI

EAGLE MV

Trackside Full Vehicle Machine Vision System (TFV-MV)

INSPECTIONS AND MEASUREMENTS

  • 360-degree view: Vehicle top, side, bottom
  • Wheels surface failures: flat, spalling
  • Brake pad and pantograph contact strip wear
  • Missing parts, deforming, wrong positioning
  • Attached foreign objects recognition

FEATURES

  • Trackside vehicle 360-degree monitoring
  • Automated failure recognition, classification, alerting
  • Component wear measure and residual life prediction
  • Driven by 2D/3D Imaging and AI technology

SPECIFICATION

  • Travel speed: 10-20 km/h
  • Wheel profile: 0.6 mm accuracy (Wheel diameter)
  • Brake pad thickness: 1.0 mm accuracy
  • Pantograph carbon strip: 0.5 mm accuracy
EAGLE MV

Underfloor Vehicle Bogie Machine Vision System (UVB-MV)

INSPECTIONS AND MEASUREMENTS

  • Vehicle undercarriage parts imaging
  • Parts checking: position, missing, deformation
  • Bolt losing, tie wire breaking and missing
  • Attached foreign objects recognition
  • Measuring: brake disk / pad

FEATURES

  • Automatic vehicle undercarriage parts checking
  • Automatic failure recognition, classification, alerting
  • Component wear measure and residual life prediction
  • Driven by 2D/3D Imaging and AI technology

SPECIFICATION

  • Inspection time cost: 44 min / 8 vehicle  units (may vary depending on required targets)

| Underfloor Operation | Running Gear Checking | Failure Recognition| AI


OWL SERIES – MEASUREMENT & DETECTION

We also use various other technologies to measure railway vehicle parameters and to detect defects. Condition monitoring systems derived by these technologies, such as optical methods, laser imaging, thermal sensing, etc. are quite well developed and reliable. Please read more about our measurement product in section OWL SERIES.

Trackside Wheel Profile 

| Wheel Profile and Parameters | Trackside Measuring | Laser-Image Measurement

OWL SERIES

TRACKSIDE WHEEL PROFILE MEASUREMENT SYSTEM(TWP-MD)

INSPECTIONS AND MEASUREMENTS

  • Wheel profile measuring and trending
  • Wheel diameter
  • Wheel diameter differences
  • Flange thickness
  • Flange height
  • Rim width
  • qR value
  • Back-to-back wheel gauge AR
  • Tread wear
  • Equivalent Conicity, etc.

FEATURES

  • Trackside wheel profile measuring
  • High-precision Laser-Image measurement technology
  • High reliability against various environmental condition
  • Wheel profile prediction and planning the re-profile process

SPECIFICATION

  • Inspection speed: 10-20 km/h
  • Measurement accuracy: Tread Wear ±0.2 mm; Flange Thickness ±0.2 mm; qR Value ±0.4 mm; Wheel Diameter ±0.6 mm; Back-to-back Gauge Value AR ±0.6 mm

CUSTOMIZED COMPONENTS & SOLUTIONS

DTEC is a technology-driven company. Our experts are here to offer tailor-made solutions according to your specific requirements, including case studies, pilot tests, system development, production, and application. Look at the following customized work we offer at present. Contact us and get more solutions for your application case.

Customized UT Systems 

| Customized Design | UT and PAUT | Inspection Method | System Automation

Customization

CUSTOMIZED UT SYSTEM

Contact


DTEC is always at your side to offer products and services that you really need.
If you still have any questions in mind, just press “Click and Contact”.
Let us know how we can serve you.